Getting started
Pockit has partnered with tell.connect to provide Third Party Providers (“TPPs”) with access to consumer account information and payment initiation in line with regulatory requirements.
Introduction
This guide outlines the process for registration, authorising and accessing consumer information as an AISP, and initiating payments as a PISP. The detailed API specification can be found in the spec section of the website.
Developer Registration
All TPPs must register on the Example Bank developer portal.
When your register on our portal, you will be issued a unique "Client ID" & "Client Secret". These credentials will be used in authorisation API calls and must be stored securely.
In order to register you only need to provide basic user and company information and you will be able to start accessing the Sandbox immediately. In order to access the Production environment, you will be asked to provide further information relating to your TPP status, including details of registration with your National Competent Authority.
Application Registration
A TPP may operate multiple applications with different requirements and security certification.
For each application, you will be asked to provide a “Redirect URL” (the location we will return a user to after providing consent) and you will need to attach a certificate. Don’t worry if you haven’t created your redirect script yet – the system creates a default holding page which will allow you to test and integrate with the service, and you can replace this with your applications URL before going live.
API endpoints are secured with use of certificates. You can upload individual certificates for each application, or you can reuse a certificate across multiple applications. For Production access, we will verify that the certificate is valid, but you can use non-validated certificates in the Sandbox.
Environments
Pockit provides two separate environments:
Production
The Production environment allows access to real user data. As you would expect, this data is highly sensitive so we are required to perform a higher level of due diligence for applications which are to be moved into Production.
Sandbox
The Sandbox environment is broadly identical to Production but rather than connecting to live systems, it provides stubbed data. Some of the tighter usage restrictions are also eased in Sandbox, such as the need for unique requests IDs (this is described in more detail below).
Authorisation & Consent
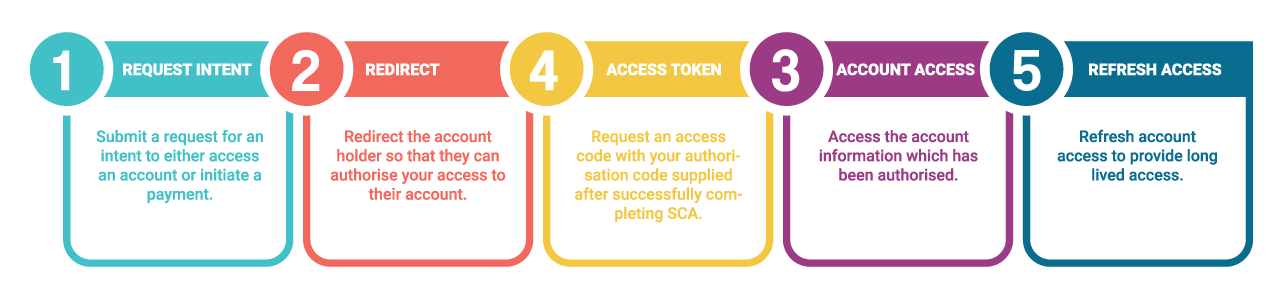
In order to provide a TPP with a user’s data or to initiate a payment on their behalf, the user is required to grant permission to the TPP for a period of up to 90 days.
User Authorisation
The first step in obtaining a user’s authorisation is the generation of an "intent-id". To do this, the TPP should POST a request to the tell.connect authorisation server endpoint indicating the details of the authorisation being requested.
The body of the request should include:
| aspsp | A unique reference for the ASPSP, in this case 8ddb14f1-fecd-41fe-90b7-f8fbda9494ac |
| uuid | A unique identifier that the TPP should generate. It is used for tracking a user’s authorisation end to end. The uuid value needs to be in a UUIDv4 format. NB uniqueness is not enforced in the Sandbox environment |
| scope | The type of authorisation being requested; aisp or pisp |
| sandbox_sca | A flag, set to true or false, indicating that the authorisation request should be automatically accepted by the ASPSP without the need for a user to perform SCA. This is only valid in Sandbox and is in place to enable a TPP to test and integrate in a frictionless manner. This flag is ignored in Production even if provided in the request. |
Authorisation Request
| Sandbox URL | https://auth-sandbox.tell.money/v1/authorise |
| Production URL | https://auth.tell.money/v1/authorise |
| Method | POST |
| Headers | "Content-Type": "application/json" "Authorization": Basic client_id:client:secret (base64 encoded) "x-jws-signature": A valid signed JWT is required – see “JWT Signing” for details |
| Body | { "aspsp": "8ddb14f1-fecd-41fe-90b7-f8fbda9494ac", "uuid": "c0fd407d-134b-4091-8e04-ab49a98db217", "scope": "aisp", "sandbox_sca": true } |
Authorisation Response
{
    "intent-id": "a077e84b-a815-4ed3-81c0-8f85d55e7c47",
    "location": "https://auth.tell.money/v1/authorise/a077e84b-a815-4ed3-81c0-8f85d55e7c47"
}
You should now redirect the user to the location provided in the response, where they will be prompted to perform SCA, review and accept the authorisation request.
If you have specified that “sandbox_sca” is “true” (sandbox only), the user will automatically be considered to have approved the request and will be automatically returned to your Redirect URL.
Authorisation Confirmation
When the user has completed the SCA and authorisation process, we will redirect them back to the Redirect URL provided when you registered the application.
If you have not yet provided your own Redirect URL in the Sandbox environment, requests will be returned to our stubbed page, which presents a textual version of the response including the outcome and authorisation code, allowing you to manually proceed.
The URL we redirect to will contain the following parameters:
| intent-id | The value we created as part of the initial authorisation request |
| uuid | The value you created to identify the request on your application |
| authorisation_code | If a value is provided, this indicates that the authorisation was successful and you may use this code to proceed to the next stage. If authorisation was unsuccessful (user declined or was unable to authenticate themselves) then this value will be null |
Redirect Response
https://{{your redirect url}}?intent-id=a077e84b-a815-4ed3-81c0-8f85d55e7c47&uuid=c0fd407d-134b-4091-8e04-ab49a98db217&authorisation_code=7cfa670a-959c-43d0-bedd-28d744233151
Obtain Access Token
With the authorisation code returned, your application can now request an Access Token which can in turn be used to access the account resource information or initiate a payment.
The authorisation code is valid for 60 seconds, so your application must exchange it for an Access Token within that timeframe or the consent authorisation will need to be repeated. In Sandbox, the code is valid for 10 minutes in order to assist development and testing.
To obtain an Access Token you should call the access-token endpoint, providing the authorisation code and specifying the “grant_type” as “authorization_code”.
The Access Token returned will permit access to the consumer data / payment initiation endpoint for a maximum of 1 hour at which point the access token will need to be refreshed.
Access Token Request
| Sandbox URL | https://auth-sandbox.tell.money/v1/access-token |
| Production URL | https://auth.tell.money/v1/access-token |
| Method | POST |
| Headers | "Content-Type”: “application/x-www-form-urlencoded” “Authorization”: Basic client_id:client:secret (base64 encoded) “x-jws-signature”: A valid signed JWT is required – see “JWT Signing” for details |
| Body | “grant_type”: “authorization_code” “code”: the value we returned as “authorisation_code” |
Access Token Response
{
       "access_token": {{Your new access token}},
       "refresh_token": {{Your new refresh token}},
       "token_type": "Bearer",
       "expires_in": 3600,
       "scope": "balance:read,product:read,accounts:read,beneficiaries:read"
}
The values returned are:
| access_token | An access token that can be used to make requests for this user / consent |
| refresh_token | A refresh token that should be stored securely and used to refresh the access token when it expires |
| token_type | Will always be “Bearer” |
| expires_in | The duration in minutes that the access_token will be valid for (will typically be 3600) |
| scope | This contains a set of permissions associated with the consent. It is a comma-separated list in the format: balance:read,product:read,accounts:read,beneficiaries:read |
Refresh Access Token
When an access token has expired, you can utilise the stored refresh token to generate a new access token using the refresh token grant. Refresh tokens expire automatically after 90 days and new refresh tokens are issued after each use of the refresh token grant.
Refresh Token Request
| Sandbox URL | https://auth-sandbox.tell.money/v1/access-token |
| Production URL | https://auth.tell.money/v1/access-token |
| Method | POST |
| Headers | "Content-Type”: “application/x-www-form-urlencoded” “Authorization”: Basic client_id:client:secret (base64 encoded) “x-jws-signature”: A valid signed JWT is required – see “JWT Signing” for details |
| Body | “grant_type”: refresh_token “refresh_token” the refresh_token provided initially |
The response object is the same as per the Access Token request above.
Account Access
With a valid consent and access token of type “aisp”, you can now start retrieving information from Pockit accounts.
Requests directly initiated by user activity (i.e. from your website or mobile application) must include the user’s IP address in a “x-user-ip” header. Requests initiated directly from your application (e.g. automated data sweeps, where the user has not manually instigated the task) should omit the “x-user-ip” header. Requests that are not initiated by the user are restricted to a maximum of 4 per endpoint per day.
Payment Initiation
With a valid consent and access token of type “pisp”, you can now submit a single payment initiation on behalf of the user.
Revoked Consent
A user may choose to revoke consent at any time. We do not proactively inform TPPs of revoked consents.
JWT Signing
In order to ensure secure communications between TPPs and the tell.connect platform, all API calls must include a valid and correctly signed JSON Web Token (JWT) in the “x-jws-signature” header. For general information on the correct creation and formatting of JWTs, visit https://jwt.io.
A valid JWT is comprised of a header, a payload and signature.
Header
The header is a JSON object comprised of:
| alg | Default to HS256 |
| typ | Default to JWT |
| app | The id of the calling application (this is available in the portal) |
| path | The path, excluding host name and version, of the API call being made. For example, a GET balance request path may be “/accounts/12345678/balance” |
| iat | The time the JWT was issued |
This object is then Base64 encoded to form the full header string.
Payload
The payload is a JSON object comprised of each of the request. Where the request requires a JSON object, the payload should contain the same data in the same format. Where the request requires form data (i.e. the content is application/x-www-form-urlencoded), you should convert the form fields to a JSON object.
This object is then Base64 encoded to form the full payload string.
Signature
As per JWT requirements, the Signature is made up of a hash of the header, payload and “secret”. In this case, the “secret” is the certificate uploaded via the portal and assigned to the application from which the request is being sent.
Going Live
When you’re ready to move into Production, simply log into the portal, select the application and click “request go-live”. Our team will carry out a series of checks and may be in touch if we require any further information or testing, after which, we will release your application access into Production.